Back to the subject line, a little thinking about a project can create some handy shortcuts. Products designed for some applications can easily be adapted for others with a few minor tweaks and sometimes work better than others designed for your specific application.
Monday, November 19, 2012
The world is your trademarked modular toy brick play set.
This weekend I helped Matt learn to solder and swap out the dead stereo in his van. While we were in there, we also equipped the older aftermarket unit with a bluetooth receiver. There aren't many good options for adding bluetooth to a car unit, most of them were either battery powered (some if you hooked them up to power would turn off and go into charge mode) and not really designed for a full time install. Logitech makes a a model designed for home stereo systems, but only comes with an AC plug for power, and requires a 5V power supply. 12V USB chargers put out 5V with enough amperage to power this, so I took apart one of the cheap chargers that I had laying around, desoldered the usb port and the cigarette lighter plug pins. I added a power pole connector for input power, drawing from some wires tapped into the stereo's wiring harness, and cut the stock plug off the AC adapter to solder right on to the board. The old case was taped back together to shield the whole works and everything powered up and tested great.
Saturday, October 13, 2012
Home electronics repair: Capacitor replacement for dummies
My Refrigerator uses a control board to run everything and I started having problems with the ice dispenser and light not working reliably, before eventually failing to work all together.
I noticed that the two above capacitors were starting to bulge out the top, the easiest indication of a failure.
The tops of these should be completely flat. These had bowed out visibly and started to open up slightly in the center. Replacing these fixed all of my issues.
This is usually a sign that the capacitor should be replaced.
The new capacitor in place, note the shiny end cap.
Theres a few reasons that capacitors tend to be the failure point. They're an expensive, bulky, yet vital component in modern electronics so often tradeoffs need to be made. A smaller capacitor can fit in a more cramped housing, but won't last as long, larger capacitors tend to be more expensive, and a device may be simply be poorly designed for its operating environment. Overheating is what typically causes capacitors to fail, but usually this is due to one of the previous reasons letting it overheat in the first place. There have also been incidents when cheap manufacturers have used stolen copies of stolen copies of electrolyte recipes resulting in capacitors that did not meet the proper spec. A batch of these bad capacitors made in the early 2000's found their way into all sorts of electronics, and Dell had an issue with a nearly 100% failure rate with one of their lines of desktop computer within one year, all due to using cheap capacitors.
Diagnostics
Typically if an electronic device stops working suddenly, the issue can be traced to a bad capacitor. You can see the brown one on the left is bowed out on the top a little, and is smaller than the same spec cap from a known quality electronics manufacturer. Other symptoms include powering on for short periods of time, random device resets, squealing sounds coming from the device, etc.
Sometimes a capacitor will start to leak, and the electrolyte will corrode nearby components
Repair
Once you've identified that a capacitor is bad (or if you want to try replacing the caps before tossing the device in the junk heap, you need to get replacement capacitors. Radio Shack still sells a few sizes but for the most part you'll need to order online from a catalog like Mouser (no minimum order, just shipping costs) or Digikey (minimum order size of around $20, plus shipping) The 2 numbers you need to match are the voltage and the capacitance (in this example, I'm replacing some 16V, 2200uf and 200V, 47uf. These are usually marked on the side of the capacitor. If you can't find an exact match, you can safely use a larger size for both values, but keep in mind that this usually makes for a physically larger capacitor as well, so the closer the match, the easier the replacement will be. For a large run capacitor like on an AC unit, make sure to use a compatible part as these are often multiple capacitors in one can. I looked up the model number for my AC unit and searched on Amazon for a compatible part number.
Tools and Skills
You should have some experience with soldering to continue. I use a 30w soldering iron, this job is much easier if you use a good iron or soldering station.
The other tools you will need are:
Soldering Iron
Solder extractor or desoldering braid
Solder
Offset/Diagonal cutters
If the board is not clearly marked, note which side the negative (-) side of the capacitor is facing. The lighter stripe and - sign indicate the negative side. This board is also clearly marked for each component.
I remove the old capacitor from the board by heating the solder around its terminals and using the solder extractor to suck the melted metal from around the contact. The extractor has a spring loaded piston which is released by pressing a button, creating a strong suction.
The old capacitor can now be pulled free, note the clearly marked + side of the board. The longer lead on the new capacitor is the positive (+) and the shorter the negative. This is also marked on the side of the capacitor as noted previously.
I bend the leads outwards to hold the capacitor in place while I flip the board upside down to solder.
The solder should flow cleanly around the lead and board
 |
And the excess leads are cut away.
Wednesday, October 10, 2012
Piezo buzzers in the home are sometimes too loud
I have a few UPS units and a power inverter around my home that all use piezo buzzers as alarms. These are designed to get your attention to let you know the UPS is running on backup power or that the battery driving an inverter is low. Often these are used in office or noisy server environments so the buzzer needs to be loud enough to cut through the noise to let you know this is a problem.
I've found this to be too loud, especially with some of these in my bedroom. I can usually tell when the power is out so I don't need the UPS to tell me. Some newer UPS units have a way to disable or change the volume on the alarm, however most cheaper units do not. Many people fix this by cracking open their devices and either desoldering or cutting off the buzzer.
A far easier fix is to put a small piece of packing or scotch tape over the buzzer. This does not completely silence the alarm, but makes it significantly quieter, and can easily be reversed. The tape minimizes how much air the buzzer can vibrate, dampening the sound.
If you're not comfortable opening up your electronics, find a teacher to assist you. "No user serviceable parts inside" is manufacturer speak for "be careful when doing something stupid"
Sunday, October 7, 2012
Capturing wild food
Occasionally throughout the year I have opportunities to get great locally grown or wild grown food. My parents keep a sizable garden most years, and I frequently get strawberries, tomatoes, butternut squash, etc depending on how the season happens to be. There's also a few large patches of wild blueberries that grow near where I grew up. It's currently scallop season out on Nantucket Island and I'm fortunate enough to bring some home when there's a good season.
Scallops have blue eyes, one along each of the ridges at the edge of the shell. They have one large muscle that they use to open and close the shell rapidly, creating a jet of water out the back and allowing them to move along the sea floor. This muscle is what we eat, and on the Nantucket bay scallop, this muscle is small, sweet and extremely rich.
We go out at low tide, when its shallow enough to wade out into the bay, and a rake/net like the one above is pushed along the bottom, stirring up scallops, weeds and other shellfish from the bottom. My dad has become quite an expert at finding them, some of the better pushes can find 20 or 30 at a time.
It's a good season.
We go out at low tide, when its shallow enough to wade out into the bay, and a rake/net like the one above is pushed along the bottom, stirring up scallops, weeds and other shellfish from the bottom. My dad has become quite an expert at finding them, some of the better pushes can find 20 or 30 at a time.
These are then sorted, discarding any junk, empty shells, and scallops that are too small or do not show a growth ridge, indicating that they've had one breeding season and are legal to harvest. The sorting table shown is my dad's design.
A couple hours work with my dad pushing and Matt and my brother sorting, and we have our bushel quota for the license. A bushel yields about 6 pounds of cleaned scallops.
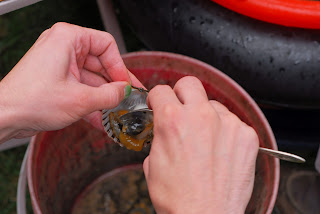
My dad openen the scallops, using a shellfish knife to pry the shell open and leaving the uncleaned half shells for Matt, my brother and myself.
The guts are then pulled away from the muscle, leaving just the half shell with the muscle stuck to it. The muscle is then cut away from the shell and saved.
The discarded shells and other material is dumped at a public drop off dumpster closer to town.
The odor is rather strong.
We prepared some of them ceviche for today's lunch, soaked for about 24 hours in lime juice to cook the outer layer and give the scallop a nice citrus flavor. The lower picture shows how deep the citrus cooking soaked into the meat. We used a recipe my Mom found at Jan's Sushi Bar
Friday, September 21, 2012
Carbonating at Home
Before I moved into my current place, I learned about how to carbonate soda at home after seeing SodaStream's (at the time called Soda Club) Being able to produce a liter of seltzer for 20-25 cents and not needing to carry the bottles home seemed like a great idea with 1L bottles of seltzer running about $1 in the grocery store. Also not needing to store bottles is handy, as one charge produces about 60L. The initial investment for a machine priced on Amazon is about $100 for a starter kit, plus another $65 for a spare CO2 tank, and $20 for a 2-pack of 1L carbonation bottles. Total about $185 which includes the gas for your first 120 liters of soda.
The idea looked cool but there weren't any local places to exchange tanks and it bothered me that I had to use their proprietary system (paintball tank fills, about the same size, ran $2-3 a fill versus $15 for the soda stream) also, there was no promise that the company would be around in a few years to keep exchanging the tanks via mail. This has since changed and even Staples exchanges tanks at many of their stores.
After doing some research, I discovered this site
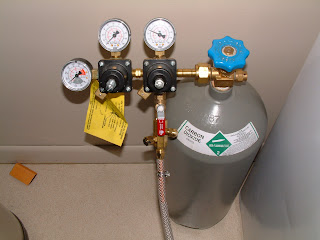
which covered the basics of the science behind carbonation as well as a straightforward build to carbonate at home. My mk I build ( http://www.atroxen.com/tsaro/index.php?id=soda ) was essentially this setup, a 20lb CO2 tank, regulator and misc fittings to feed gas into a soda bottle for carbonation. I highly recommend this site for more information than you ever wanted to know about home carbonation. Instead of 20-25 cents a liter, this setup costs about 2-3 cents a liter. A 20lb fill of CO2 locally costs me about $30 at a welding shop and contains about 40x the gas of a Soda Stream refill for twice the cost. So each 20lb fill saves me about $570 versus carbonating with the Soda Stream. My first build ran about $130 for the CO2 tank and first 20lb fill, $50 for a regulator, and another $20 for misc tubing and hardware, about $200 total.
I've since expanded my system to carbonate a 5 gallon soda keg instead of doing soda in 1-2L batches and added a soda gun to dispense. I've since moved and no longer have the chest freezer in my kitchen, which makes storing soda syrups difficult so the gun currently just dispenses still or sparkling water.
If you're a home beer brewer and want to move to a keg/draft setup, this option is an obvious choice, just get a double regulator (slightly more expensive but not more than an extra $20 or $30) so you can have different pressures for beer and soda. I currently have an under-bar fridge that can hold 2 5 gallon cornelius, one for beer, one for seltzer.
Buying a soda stream is a very good choice versus buying from the grocery store, provided you have good water or can filter your own tap water. You save about 75% of the cost which will pay for the machine and spare bottles, cylinders, etc relatively quickly if you drink a fair bit of seltzer.
If you don't mind moving heavier tanks and working with high pressure gasses, you can save even more, about 98% of the cost over store bought, or 92% over the Soda Stream, and the first 20lb fill will cover $570 worth of additional fills over the Soda Stream.
Either option saves substantially and pays for itself versus grocery store seltzer rather quickly. I stopped counting when the savings covered the cost of my bar, beer brewing equipment, beer draft equipment and initial setup cost versus buying store bought.
Wednesday, September 19, 2012
A more graceful all-angle sprayer
Lifehacker linked to an instructables article about multi-angle sprayer
http://www.instructables.com/id/How-to-make-a-spray-bottle-that-works-in-any-direc/
While using bolts is a bit cheaper, this seems like they might have a tendency to slip off if not sized right or as the tubing ages. I recognized a similar device from RC model fuel tanks called a clunk.
Its designed for model fuel so it shouldn't corrode, not too expensive (a few dollars) and slips into the aquarium tubing without any modification.
Monday, September 17, 2012
Try to minimize the use of duct tape when mixing water and electricity.
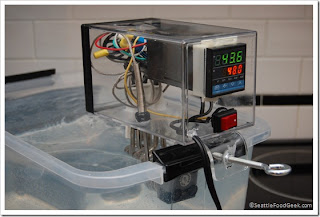
I've seen a fair number of DIY Sous Vide setups and I was inspired to build my own. I found a number of builds through instructables and other sites and settled on building an immersion circulator design due to the versatility. The setups I decided to base my design off were all-in-one type units designed to emulate laboratory circulators (usually between $1000 and $2000) but significantly cheaper. The design used by Seattle Food Geek is a great example of one of these builds. Some variants split out the temperature controller from the heater/circulator which is what I decided to do with mine.
What I liked about these builds:
-Readily available parts
-Inexpensive to build
-Some attention to safety (GFCI outlets recommended)
-Good electrical designs
What I did not like:
-GFCI outlets often integrated but no fuse
-all-in-one builds perched over a bath of water
-split controller builds used awkward setups to hold heaters
-mounting components to keep the entire build out of the water were glued in place
The lack of a fuse on the majority of the builds I've seen is rather concerning, especially when GFCI outlets are being suggested as a safety feature. I usually operate my system either in a kitchen or bathroom (easy access to water to fill) and both of these rooms have GFCI outlets already in place, so I opted for a more compact single outlet. It seems other builders have had very good luck with their all-in-one setups but I just feel uneasy having my entire controller sitting above a tub of water. Also, having my controller modular means I can use the same controller to run a rice cooker for smaller batches or higher temperatures (my circulator pump has a safety shutoff if the bath gets too far above 160F)
With the modular controller, I still wanted to use a circulator design rather than drive a rice cooker or other appliance. I didn't really like how most of the heater assemblies looked and I hadn't yet found the bucket heaters that some such projects used. I decided to use PVC pipe to hold 3 heater coils in place and provide a mounting point for the circulator pump. By drilling holes to fit the heater bases snugly, I was able to then cut the pipe and pressure fit the heaters in place with an end cap and a pipe coupler. This keeps the heaters in place tight and and means that if a heater fails, I can take the assembly apart and replace one heater without removing and replacing glue.
My system does have one major problem in the heater/circulator design. The fountain pumps often used for circulators aren't designed for high temperature use. In practice, the pump that I use has a thermal safety shutoff somewhere between 160F and 165F This isn't a problem for most of my recipes, as meats generally come out best between 130F and 150F and fish works well even lower. Cooking custard for an ice cream base is the only recipe I've needed to switch to a smaller rice cooker for, but I can use my same controller for this purpose.
The overall designs of these systems are all the same. A precise thermostat, usually in the form of a PID controller is used to drive heaters that keep a bath of water at the same temperature, +/- a degree or two. These can be anything from the DIY circulators like mine, to just a temperature controller regulating a large rice cooker, crock pot, etc. Also, the PID controllers used can also be programmed for a cooling setup. I use another identical build to operate a chest freezer that I use as a lagering chest when brewing beer. I can use this controller to operate the freezer at refrigerator temperatures by cycling the compressor on and off bypassing the built in analog thermostat (just make sure to program the PID to give the compressor enough time to rest between cycles) My brother uses one with a thermoelectric cooler to culture his own kefir, a yogurt-like dairy product.
Since building my rig, I've also come across some builds that were downright scary. They are more or less the same design I described, but instead of cases, make heavy use of tape to cover up bare contacts and hold the bare components in place. The tutorials on qandabe advise to only do these builds if you are comfortable working with electricity but I would hope anyone sufficiently comfortable would put a bit more thought into the designs and at least put a case around these components.
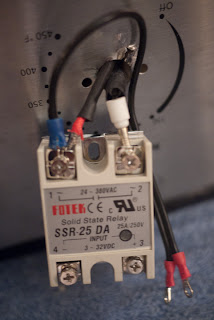
Another offender linked from the same site. Heat shrink is used to keep the wires a bit better protected but the metal still looks pretty sharp and too much movement of the relay will wear through that insulation rather quickly. These builds are great proof-of-concept builds. The wiring works and careful use should be safe. A little extra work though could take these builds to the next level.
With a modular build like I use, one could use a roaster such as this and just set the internal thermostat to 450 (a sous vide rig will never get this hot) and just plug into the control box. Building a control box takes a bit more time and effort but is far safer and more versatile. This method also doesn't destroy the appliance you are using. Some arguments for builds like this are that they're cheaper, don't require specialty tools (other than a few common hand tools) and are easy to build. Using a small pelican case for my builds cost an extra $22 for the case and extra costs for connectors, a fuse holder and power switch but the only extra tools I used were a hand drill, file and dremel (though the dremel work could easily be done with a hack saw, file or some sturdy metal snips) but I think the results speak for themselves.
Subscribe to:
Comments (Atom)


